Appearance
VitePress
什么是 VitePress
vitepress 是基于 vite 和 vue 的静态网站搭建的脚手架,非常适合搭建项目文档、个人博客等静态网站。所有的 Markdown 文件都通过Vite处理编译成 Vue 组件。你可以并且应当使用相对 URL 引用静态资源。
搭建项目
1.创建项目
sh
mkdir project && cd projectmkdir project && cd project2.初始化包管理器
shell
pnpm initpnpm init3.安装 vitepress
sh
pnpm add vitepress -Dpnpm add vitepress -D4.创建文档
sh
mkdir docs && echo '# Hello VitePress' > docs/index.mdmkdir docs && echo '# Hello VitePress' > docs/index.md5.在package.json中添加启动项目的脚本命令
json
{
  "scripts": {
    "docs:dev": "vitepress dev docs",
    "docs:build": "vitepress build docs",
    "docs:serve": "vitepress serve docs"
  }
}
{
"scripts": {
"docs:dev": "vitepress dev docs",
"docs:build": "vitepress build docs",
"docs:serve": "vitepress serve docs"
}
}6.本地启动项目
sh
pnpm run docs:devpnpm run docs:dev布局配置
vitepress 项目其工程源文件都在docs中创建。
可以对项目进行自定义配置,例如网页标题名称、元信息、主题配置、源文件路径进行设置。
在.vitepress中创建config.js文件
js
// doc/.vitepress/config.js
import { defineConfig } from "vitepress";

export default defineConfig({
  title: "vitepress训练场",
  description: "hello",
  // 设置项目源文件
  srcDir: "./src",
});
// doc/.vitepress/config.js
import { defineConfig } from "vitepress";
export default defineConfig({
title: "vitepress训练场",
description: "hello",
// 设置项目源文件
srcDir: "./src",
});1.配置导航栏(头部)
导航栏可以帮助用户跳转到不同的路径下,从而查看对应路径的页面内容。vitepress 可以很轻松的根据导航表渲染成导航栏组件。
一级导航菜单
js
export default {
  themeConfig: {
    nav: [
      { text: "Guide", link: "/guide" },
      { text: "Config", link: "/config" },
      { text: "Changelog", link: "https://github.com/..." },
    ],
  },
};
export default {
themeConfig: {
nav: [
{ text: "Guide", link: "/guide" },
{ text: "Config", link: "/config" },
{ text: "Changelog", link: "https://github.com/..." },
],
},
};二级导航菜单
简单示例
js
export default {
  themeConfig: {
    nav: [
      { text: "Guide", link: "/guide" },
      {
        text: "Dropdown Menu",
        items: [
          { text: "Item A", link: "/item-1" },
          { text: "Item B", link: "/item-2" },
          { text: "Item C", link: "/item-3" },
        ],
      },
    ],
  },
};
export default {
themeConfig: {
nav: [
{ text: "Guide", link: "/guide" },
{
text: "Dropdown Menu",
items: [
{ text: "Item A", link: "/item-1" },
{ text: "Item B", link: "/item-2" },
{ text: "Item C", link: "/item-3" },
],
},
],
},
};导航标题
二级导航导航合集的标题,可以将某部分导航项合并在一起,并给他们显示集合的标题。
js
import { defineConfig } from "vitepress";

export default defineConfig({
  themeConfig: {
    nav: [
      { text: "Guide", link: "/guide" },
      {
        text: "前端知识体系",
        items: [
          {
            // Title for the section.
            text: "HTML",
            items: [
              { text: "基本标签", link: "..." },
              { text: "文档结构", link: "..." },
            ],
          },
          {
            // Title for the section.
            text: "CSS",
            items: [
              { text: "选择器", link: "..." },
              { text: "常见属性", link: "..." },
              { text: "布局", link: "..." },
            ],
          },
        ],
      },
    ],
  },
  title: "vitepress训练场",
  description: "hello",
  srcDir: "./src",
});
import { defineConfig } from "vitepress";
export default defineConfig({
themeConfig: {
nav: [
{ text: "Guide", link: "/guide" },
{
text: "前端知识体系",
items: [
{
// Title for the section.
text: "HTML",
items: [
{ text: "基本标签", link: "..." },
{ text: "文档结构", link: "..." },
],
},
{
// Title for the section.
text: "CSS",
items: [
{ text: "选择器", link: "..." },
{ text: "常见属性", link: "..." },
{ text: "布局", link: "..." },
],
},
],
},
],
},
title: "vitepress训练场",
description: "hello",
srcDir: "./src",
});自定义匹配导航项高亮规则
activeMatch可以自定义配置导航项高亮规则。
给对应导航项配置,若当前路径为 xxx 时,该导航项会高亮。
js
export default defineConfig({
  themeConfig: {
    nav: [
      { text: "Guide", link: "/guide" },
      {
        text: "Dropdown Menu",
        // 当路由路径为config时,该导航项会高亮
        activeMatch: "/config",
        items: [
          { text: "Item A", link: "/item-1" },
          { text: "Item B", link: "/item-2" },
          { text: "Item C", link: "/item-3" },
        ],
      },
    ],
  },
});
export default defineConfig({
themeConfig: {
nav: [
{ text: "Guide", link: "/guide" },
{
text: "Dropdown Menu",
// 当路由路径为config时,该导航项会高亮
activeMatch: "/config",
items: [
{ text: "Item A", link: "/item-1" },
{ text: "Item B", link: "/item-2" },
{ text: "Item C", link: "/item-3" },
],
},
],
},
});2.侧边导航(右侧)
vitepress 可以很轻松的根据导航配置项渲染一个具有路由导航功能的侧边菜单栏。
导航项的基本结构
ts
interface NavItem {
  // 导航项的标题
  text: string;
  // 导航链接(若未配置该属性,则该导航项不是超链接)
  link?: string;
  // 子项(若配置了该属性,则会渲染子路由菜单)
  items?: NavItem[];
}
interface NavItem {
// 导航项的标题
text: string;
// 导航链接(若未配置该属性,则该导航项不是超链接)
link?: string;
// 子项(若配置了该属性,则会渲染子路由菜单)
items?: NavItem[];
}简单示例
js
import { defineConfig } from "vitepress";

export default defineConfig({
  themeConfig: {
    sidebar: [
      {
        // 独立导航项
        text: "首页",
        link: "/",
      },
      {
        // 集合导航
        text: "JS",
        items: [
          { text: "声明变量的方式", link: "/js/var" },
          { text: "函数", link: "/js/function" },
        ],
      },
    ]
});
import { defineConfig } from "vitepress";
export default defineConfig({
themeConfig: {
sidebar: [
{
// 独立导航项
text: "首页",
link: "/",
},
{
// 集合导航
text: "JS",
items: [
{ text: "声明变量的方式", link: "/js/var" },
{ text: "函数", link: "/js/function" },
],
},
]
});嵌套导航菜单
js
import { defineConfig } from "vitepress";

export default defineConfig({
  themeConfig: {
    sidebar: [
      {
        // 独立导航项
        text: "首页",
        link: "/",
      },
      {
        // 集合导航项
        text: "JS",
        items: [
          { text: "声明变量的方式", link: "/js/var" },
          { text: "函数", link: "/js/function" },
        ],
      },
      {
        // 多级导航
        text: "CSS",
        items: [
          //一级路由
          {
            text: "常见属性",
            items: [
              {
                text: "font-size",
                link: "...",
              },
              {
                text: "background-color",
                link: "...",
              },
              {
                text: "color",
                link: "...",
              },
            ],
          },
          // 一级路由
          {
            text: "布局",
            items: [
              // 二级路由
              {
                text: "浮动",
                link: "...",
              },
              {
                text: "弹性盒容器",
                // 二级路由路径
                link:'...',
                items: [
                  // 三级路由
                  {
                    text: "display:felx",
                    link: "...",
                  },
                  {
                    text: "flex-direction",
                    link: "...",
                  },
                ],
              },
            ],
          },
        ],
      },
    ]
});
import { defineConfig } from "vitepress";
export default defineConfig({
themeConfig: {
sidebar: [
{
// 独立导航项
text: "首页",
link: "/",
},
{
// 集合导航项
text: "JS",
items: [
{ text: "声明变量的方式", link: "/js/var" },
{ text: "函数", link: "/js/function" },
],
},
{
// 多级导航
text: "CSS",
items: [
//一级路由
{
text: "常见属性",
items: [
{
text: "font-size",
link: "...",
},
{
text: "background-color",
link: "...",
},
{
text: "color",
link: "...",
},
],
},
// 一级路由
{
text: "布局",
items: [
// 二级路由
{
text: "浮动",
link: "...",
},
{
text: "弹性盒容器",
// 二级路由路径
link:'...',
items: [
// 三级路由
{
text: "display:felx",
link: "...",
},
{
text: "flex-direction",
link: "...",
},
],
},
],
},
],
},
]
});独享侧边栏
vitepress 允许某个路由渲染独特的菜单栏。
js
export default {
  themeConfig: {
    sidebar: {
      // This sidebar gets displayed when a user
      // is on `guide` directory.
      "/guide/": [
        {
          text: "Guide",
          items: [
            { text: "Index", link: "/guide/" },
            { text: "One", link: "/guide/one" },
            { text: "Two", link: "/guide/two" },
          ],
        },
      ],

      // This sidebar gets displayed when a user
      // is on `config` directory.
      "/config/": [
        {
          text: "Config",
          items: [
            { text: "Index", link: "/config/" },
            { text: "Three", link: "/config/three" },
            { text: "Four", link: "/config/four" },
          ],
        },
      ],
    },
  },
};
export default {
themeConfig: {
sidebar: {
// This sidebar gets displayed when a user
// is on `guide` directory.
"/guide/": [
{
text: "Guide",
items: [
{ text: "Index", link: "/guide/" },
{ text: "One", link: "/guide/one" },
{ text: "Two", link: "/guide/two" },
],
},
],
// This sidebar gets displayed when a user
// is on `config` directory.
"/config/": [
{
text: "Config",
items: [
{ text: "Index", link: "/config/" },
{ text: "Three", link: "/config/three" },
{ text: "Four", link: "/config/four" },
],
},
],
},
},
};3.配置首页
想要配置首页,在根目录中创建 index.md 文件,并在该 md 文件中进行配置。配置文档
yaml
---
layout: home

hero:
  name: 主标题
  text: 内容信息
  tagline: 副内容信息
  image:
    src: /logo.png
    alt: 网站的 logo 图片
  actions:
    - theme: brand
      text: 快速开始
      link: /guide/what-is-vitepress
    - theme: alt
      text: 在 github 上查看
      link: https://github.com/vuejs/vitepress
features:
  - icon: ⚡️
    title: 这里是功能区 1
    details: 这里是功能区 1 详情信息
  - icon: 🖖
    title: 这里是功能区 2
    details: 这里是功能区 2 详情信息
  - icon: 🛠️
    title: 这里是功能区 3
    details: 这里是功能区 3 详情信息
---
---
layout: home
hero:
name: 主标题
text: 内容信息
tagline: 副内容信息
image:
src: /logo.png
alt: 网站的 logo 图片
actions:
- theme: brand
text: 快速开始
link: /guide/what-is-vitepress
- theme: alt
text: 在 github 上查看
link: https://github.com/vuejs/vitepress
features:
- icon: ⚡️
title: 这里是功能区 1
details: 这里是功能区 1 详情信息
- icon: 🖖
title: 这里是功能区 2
details: 这里是功能区 2 详情信息
- icon: 🛠️
title: 这里是功能区 3
details: 这里是功能区 3 详情信息
---4.配置右侧文档大纲
若文档都需要显式视图大纲(当前文档的一级、二级等标题导航),就可以配置themeConfig.outline,其默认值为 2,也就右侧大纲导航栏只显示二级标题,若想让大纲显示所有级别的可以设置为"deep"。
outline
js
import { defineConfig } from "vitepress";

export default defineConfig({
  srcDir: "./src",
  themeConfig: {
    // deep会显示当前文档(当前md文件)所有级别的标题。
    // 2 只显示二级标题
    // [2,3]只显示2、3级标题。
    // [2,6]会显示2到6级标题
    outline: "deep",
  },
});
import { defineConfig } from "vitepress";
export default defineConfig({
srcDir: "./src",
themeConfig: {
// deep会显示当前文档(当前md文件)所有级别的标题。
// 2 只显示二级标题
// [2,3]只显示2、3级标题。
// [2,6]会显示2到6级标题
outline: "deep",
},
});高级配置 outline
若传入一个对象,则可以进行高级配置,可以配置导航目录的标题。
js
themeConfig: {
    outline: {
      // 显示2到6级标题
      level: [2, 6],
      // 导航锚链接标题
      label: '目录'
    }
}themeConfig: {
outline: {
// 显示2到6级标题
level: [2, 6],
// 导航锚链接标题
label: '目录'
}
}5.网页图标
页面引用文件
在/docs/.vitepress/config.js中通过 head 配置网页头部,引用图标资源
js
export default {
  head: [["link", { rel: "icon", href: "/favicon.ico" }]],
};
export default {
head: [["link", { rel: "icon", href: "/favicon.ico" }]],
};创建文件
在文档根目录下创建/public文件夹,并创建favicon.ico文件即可
路由
vitepress 是根据文件结构来生成路由表和Nuxt很像。例如设置了项目源文件路径为src之后(此后的例子都是根据此配置来添加路由规则的)
1.创建路由映射
例如要创建一个 首页(/)和起始(/guide)路由,可以创建 src 文件夹在 src 文件夹中创建index.md和guide.md文件,这样就可以通过这两个路由路径来访问对应页面了。
md
/docs/src/index.md
首页
/docs/src/index.md
首页md
/docs/src/guide.md
开始
/docs/src/guide.md
开始2.路由导航
可以完全使用 md 语法来实现路由导航。
md
<!-- 推荐 -->

[Getting Started](./guide)
[Getting Started](../home)

<!-- 不推荐 -->

[Getting Started](./getting-started.md)
[Getting Started](./getting-started.html)
<!-- 推荐 -->
[Getting Started](./guide)
[Getting Started](../home)
<!-- 不推荐 -->
[Getting Started](./getting-started.md)
[Getting Started](./getting-started.html) 路由导航的方式:
md
# 开始

[去首页](./){target="\_self"} // 本页面方式
[声明变量的三种方式](./js/var){target="\_blank"} // 打开新标签页访问目标网页。
# 开始
[去首页](./){target="\_self"} // 本页面方式
[声明变量的三种方式](./js/var){target="\_blank"} // 打开新标签页访问目标网页。3.嵌套路由
要想实现多级路由嵌套,可以创建一个文件夹,在文件夹中创建 md 文件,即可配置其路由规则。
例如在根文件夹中创建名叫js文件夹(任意名称),然后在该文件夹中创建var.md(任意名称),随后就可以通过/js/var来访问该页面了。
Frontmatter 配置
在 vitepress 工程中,每个 md 文件都是可以配置Frontmatter,是 支持基于页面的配置,你可以使用 frontmatter 配置来覆盖站点级或主题级配置选项。此外,还有一些配置选项只能在 frontmatter 中定义。更多配置
例如:在/docs/index.md 中创建文件,并写入内容
md
---
title: Docs with VitePress
editLink: true
---
---
title: Docs with VitePress
editLink: true
---Frontmatter,就相当于对页面的一种配置,可以设置页面的显示方式。
0.注意
1.所有的键值对需要通过冒号+空格隔开写,否则不会生效。
2.任何包含 YAML frontmatter 块的 Markdown 文件都将由gray-matter处理。Frontmatter 块必须位于在 Markdown 文件的顶部,必须是有效的 YAML 格式,放置在三点划线之间。
1.title
- 类型:
string
页面的标题。它与 config.title 相同,并且覆盖站点级配置。
md
---
title: VitePress
---
---
title: VitePress
---2.titleTemplate
- 类型:
string | boolean
标题的后缀。它与 config.titleTemplate 相同,并覆盖站点级配置,会给网页标题后面默认加上一段内容。
md
---
title: VitePress
titleTemplate: Vite & Vue powered static site generator
---
---
title: VitePress
titleTemplate: Vite & Vue powered static site generator
---3.layout
- 类型:
doc | home | page - 默认值:
doc
确定页面的布局。
doc:VitePress 会将默认的文档样式应用于 Markdown 内容。home:VitePress 为首页提供了特殊的布局。你可以添加额外的选项,如hero和features,以快速创建漂亮的首页。page:与doc类似,但不对内容应用任何样式。在你想创建完全自定义页面时非常有用。
---
layout: doc
---
---
layout: doc
---4.hero(首页)
当 layout 设置为 home 时, hero 配置将会生效。更多详细信息参见默认主题:首页。
示例:
md
---
layout: home

hero:
  name: VitePress
  text: Vite & Vue powered static site generator.
  tagline: Lorem ipsum...
  image:
    src: /logo.png
    alt: VitePress
  actions:
    - theme: brand
      text: Get Started
      link: /guide/what-is-vitepress
    - theme: alt
      text: View on GitHub
      link: https://github.com/vuejs/vitepress
---
---
layout: home
hero:
name: VitePress
text: Vite & Vue powered static site generator.
tagline: Lorem ipsum...
image:
src: /logo.png
alt: VitePress
actions:
- theme: brand
text: Get Started
link: /guide/what-is-vitepress
- theme: alt
text: View on GitHub
link: https://github.com/vuejs/vitepress
---各个配置项的含义
ts
interface Hero {
  // 显示在 `text` 上方的字符串。带有品牌颜色,内容较短,例如产品名。
  name?: string;

  // Hero 部分的主要文字内容。将会定义为 `h1` 标签。
  text: string;

  // 显示在 `text` 下方的标语。
  tagline?: string;

  // 显示在 `text` 和 `tagline` 区域旁边的图像。
  image?: ThemeableImage;

  // 在 Hero 部分显示的动作按钮。
  actions?: HeroAction[];
}

type ThemeableImage =
  | string
  | { src: string; alt?: string }
  | { light: string; dark: string; alt?: string };

interface HeroAction {
  // 按钮的主题色,默认为 `brand`。
  theme?: "brand" | "alt";

  // 按钮的文本标签。
  text: string;

  // 按钮的目的地链接。
  link: string;
}
interface Hero {
// 显示在 `text` 上方的字符串。带有品牌颜色,内容较短,例如产品名。
name?: string;
// Hero 部分的主要文字内容。将会定义为 `h1` 标签。
text: string;
// 显示在 `text` 下方的标语。
tagline?: string;
// 显示在 `text` 和 `tagline` 区域旁边的图像。
image?: ThemeableImage;
// 在 Hero 部分显示的动作按钮。
actions?: HeroAction[];
}
type ThemeableImage =
| string
| { src: string; alt?: string }
| { light: string; dark: string; alt?: string };
interface HeroAction {
// 按钮的主题色,默认为 `brand`。
theme?: "brand" | "alt";
// 按钮的文本标签。
text: string;
// 按钮的目的地链接。
link: string;
}5.Features(首页)
当 layout 设置为 home 时, features 配置将会生效。你可以在 hero 部分之后列出你想要显示的任意数量的功能。要配置它,请将 features 选项传递给 frontmatter。
你可以为每个功能提供一个图标,可以是表情符号或任何类型的图像。当配置的图标是图像(svg、png、jpeg...)时,你必须为图像提供适当的宽度和高度;你还可以在需要时提供描述、其内在大小以及深色和浅色主题的变体。
示例
md
---
layout: home

features:
  - icon: 🛠️
    title: Simple and minimal, always
    details: Lorem ipsum...
  - icon:
      src: /cool-feature-icon.svg
    title: Another cool feature
    details: Lorem ipsum...
  - icon:
      dark: /dark-feature-icon.svg
      light: /light-feature-icon.svg
    title: Another cool feature
    details: Lorem ipsum...
---
---
layout: home
features:
- icon: 🛠️
title: Simple and minimal, always
details: Lorem ipsum...
- icon:
src: /cool-feature-icon.svg
title: Another cool feature
details: Lorem ipsum...
- icon:
dark: /dark-feature-icon.svg
light: /light-feature-icon.svg
title: Another cool feature
details: Lorem ipsum...
---含义
ts
interface Feature {
  // 每个 feature 中显示的图标。
  icon?: FeatureIcon;

  // feature 中的标题。
  title: string;

  // feature 中的详情。
  details: string;

  // 单击 feature 时的链接,该链接可以是站内也可以是站外。
  // 如 `guid/reference/default-theme-home-page` 或 `htttps://example.com`
  link?: string;

  // 显示在 feature 组件中的链接文本,最好与 `link` 选项一起使用。
  // 如 `Learn more`,`Visit page` 等
  linkText?: string;

  // `link` 选项中链接的 rel 属性值。
  // 如 `external`
  rel?: string;
}

type FeatureIcon =
  | string
  | { src: string; alt?: string; width?: string; height: string }
  | {
      light: string;
      dark: string;
      alt?: string;
      width?: string;
      height: string;
    };
interface Feature {
// 每个 feature 中显示的图标。
icon?: FeatureIcon;
// feature 中的标题。
title: string;
// feature 中的详情。
details: string;
// 单击 feature 时的链接,该链接可以是站内也可以是站外。
// 如 `guid/reference/default-theme-home-page` 或 `htttps://example.com`
link?: string;
// 显示在 feature 组件中的链接文本,最好与 `link` 选项一起使用。
// 如 `Learn more`,`Visit page` 等
linkText?: string;
// `link` 选项中链接的 rel 属性值。
// 如 `external`
rel?: string;
}
type FeatureIcon =
| string
| { src: string; alt?: string; width?: string; height: string }
| {
light: string;
dark: string;
alt?: string;
width?: string;
height: string;
};6.最后更新时间(首页)
想要在所有文档都留下最后更新时间?不妨试试这个配置项,他只需要在首页中配置即可让所有页面都生效。
yaml
---
lastUpdated: true
---
---
lastUpdated: true
--- 同时还需要在 config.ts 中的 themeConfig 配置 lastUpdated:true
静态资源
公共资源
图片、视频、图标等公共的静态资源都保存在根目录(根目录可以被自己修改,所以注意 public 文件的路径)的 public 文件夹中。
1.默认情况下
默认情况下,需要在/docs/public中创建静态资源文件夹,可以将各种资源文件保存在这里。
例如创建了/docs/public/img/01.png文件,在 md 文件中可以通过
- md 格式创建图片
 - 通过 img 标签来访问图片
<img src="/img/01.png">
2.修改了根路径后
若在.vitepress/config.js中修改了项目根目录后,例如修改成了 src:
js
export default defineConfig({
  // srcDir会修改项目的根目录
  srcDir: "./src",
});
export default defineConfig({
// srcDir会修改项目的根目录
srcDir: "./src",
}); 则我们需要在 src 中创建 public 文件夹,其后访问资源的方式和前面的一致
某个页面独享资源
...
Vue 组件
在 vitepress 中允许在 md 文件中直接编写 vue 代码。
- 允许直接在 md 文件中编写单文件组件
- 允许自定义 vue 组件,并引入到 md 文件中渲染到页面中。
1.使用 Vue 组件
步骤:
在 docs 中创建 components 文件夹并创建对应组件
在对应 md 文件夹中写入,即可在 md 文件中渲染组件。
md
<script setup>
import CustomComponent from '../../components/navigate/index.vue'
</script>

ewf
<CustomComponent/>
qwdwqd
<script setup>
import CustomComponent from '../../components/navigate/index.vue'
</script>
ewf
<CustomComponent/>
qwdwqd留言功能
Giscus
1.安装依赖
shell
pnpm install @giscus/vuepnpm install @giscus/vue2. 在 github 上安装 giscus 应用
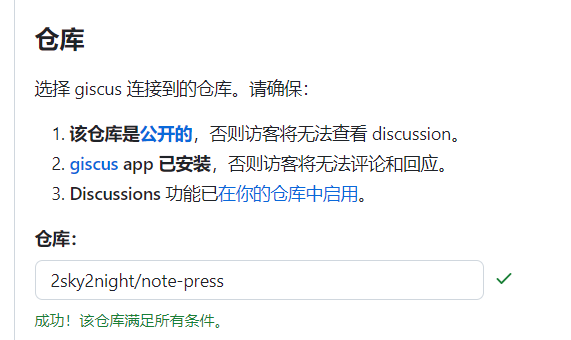
3. 前往仓库进行配置
选择 giscus 连接到的仓库。请确保:
- 该仓库是公开的,否则访客将无法查看 discussion。
- giscus app 已安装,否则访客将无法评论和回应。
- Discussions 功能已在你的仓库中启用。
给仓库开启讨论功能: 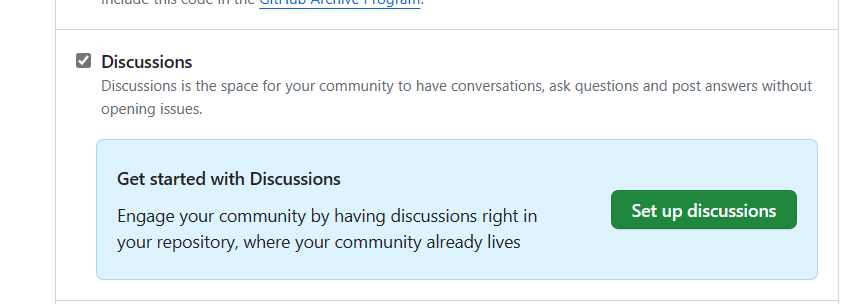
4. 前往 giscus 网页检查仓库是否可以使用讨论功能
配置成功后的结果:
配置成功后分配的 appid:
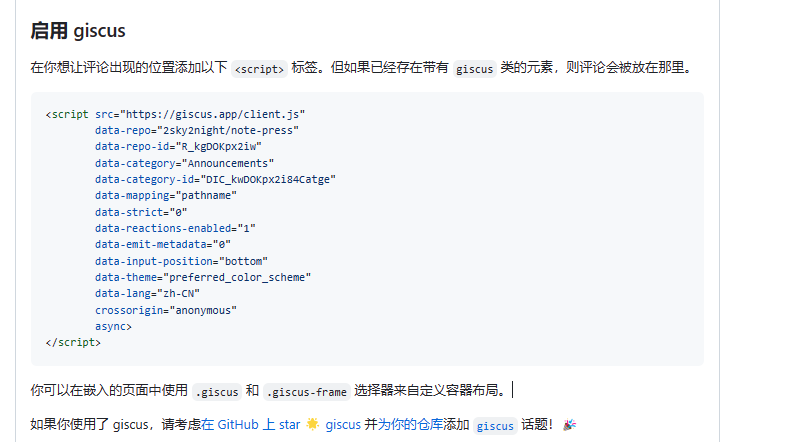
下列为示例
html
<script
  src="https://giscus.app/client.js"
  data-repo="2sky2night/note-press"
  data-repo-id="R_kgDOKpx2iw"
  data-category="Announcements"
  data-category-id="DIC_kwDOKpx2i84Catge"
  data-mapping="pathname"
  data-strict="0"
  data-reactions-enabled="1"
  data-emit-metadata="0"
  data-input-position="bottom"
  data-theme="preferred_color_scheme"
  data-lang="zh-CN"
  crossorigin="anonymous"
async></script><script
src="https://giscus.app/client.js"
data-repo="2sky2night/note-press"
data-repo-id="R_kgDOKpx2iw"
data-category="Announcements"
data-category-id="DIC_kwDOKpx2i84Catge"
data-mapping="pathname"
data-strict="0"
data-reactions-enabled="1"
data-emit-metadata="0"
data-input-position="bottom"
data-theme="preferred_color_scheme"
data-lang="zh-CN"
crossorigin="anonymous"
async></script>5.创建评论组件
创建后就可以在 md 文件中导入使用评论功能了。但是我们最好把评论组件注册到全局或直接在布局中使用该组件,这样就不需要每个页面都引入该组件了。
vue
<template>
  <Giscus
    repo="2sky2night/note-press"
    repo-id="R_kgDOKpx2iw"
    category="Announcements"
    category-id="DIC_kwDOKpx2i84Catge"
    mapping="pathname"
    strict="0"
    reactions-enabled="1"
    emit-metadata="0"
    input-position="bottom"
    theme="preferred_color_scheme"
    lang="zh-CN"
    crossorigin="anonymous"
    async />
</template>

<script lang="ts" setup>
import Giscus from "@giscus/vue";
</script><template>
<Giscus
repo="2sky2night/note-press"
repo-id="R_kgDOKpx2iw"
category="Announcements"
category-id="DIC_kwDOKpx2i84Catge"
mapping="pathname"
strict="0"
reactions-enabled="1"
emit-metadata="0"
input-position="bottom"
theme="preferred_color_scheme"
lang="zh-CN"
crossorigin="anonymous"
async />
</template>
<script lang="ts" setup>
import Giscus from "@giscus/vue";
</script>6.在 page 页面底部统一添加评论
若我们在每个 md 文件都去引入评论组件,那也太麻烦了。我们可以通过修改默认主题,给默认主题添加对应插槽,将评论组件注入到对应插槽中去即可。
创建 layout 文件
在.vitepress/theme下创建layout/index.vue用来保存布局,通过导入 vitepress 提供的 Layout 组件(这个组件包含了整个默认主题的内容),并引入评论组件,添加到 Layout 组件对应插槽中去即可。
TIP
doc-footer-before既是 Layout 组件提供的插槽,其只有在formatter配置下的 layout 为 doc 才会显示的插槽,其位置在文档底部之前,很适合插入我们的评论组件。
vue
<template>
  <Layout>
    <template #doc-footer-before><Comment /> </template>
  </Layout>
</template>

<script lang="ts" setup>
import DefaultTheme from "vitepress/theme";
import Comment from "../../../components/giscus/index.vue";
const { Layout } = DefaultTheme;
</script><template>
<Layout>
<template #doc-footer-before><Comment /> </template>
</Layout>
</template>
<script lang="ts" setup>
import DefaultTheme from "vitepress/theme";
import Comment from "../../../components/giscus/index.vue";
const { Layout } = DefaultTheme;
</script>覆盖默认主题
在.vitepress/theme创建 index.ts 文件,即可覆盖默认主题。
ts
import Layout from "./layouts/index.vue";

export default {
  Layout,
  enhanceApp({ app, router, siteData }) {
    // ...
  },
};
import Layout from "./layouts/index.vue";
export default {
Layout,
enhanceApp({ app, router, siteData }) {
// ...
},
};7.评论主题与网页主题同步
评论主题在默认情况下是不同步的,所以我们需要自己去完善评论的逻辑,实现评论主题自适应。
TIP
useData 这个钩子提供了网页相关的配置,包括了主题,并且该数据是响应式的。
vue
<template>
  <Giscus
    repo="2sky2night/note-press"
    repo-id="R_kgDOKpx2iw"
    category="Announcements"
    category-id="DIC_kwDOKpx2i84Catge"
    mapping="pathname"
    strict="0"
    reactions-enabled="1"
    emit-metadata="0"
    input-position="bottom"
    :theme="isDark"
    lang="zh-CN"
    crossorigin="anonymous"
    async />
</template>

<script lang="ts" setup>
import { computed } from "vue";
import { useData } from "vitepress";
import Giscus from "@giscus/vue";

const pageData = useData();

const isDark = computed(() => {
  return pageData.isDark.value ? "dark" : "light";
});
</script><template>
<Giscus
repo="2sky2night/note-press"
repo-id="R_kgDOKpx2iw"
category="Announcements"
category-id="DIC_kwDOKpx2i84Catge"
mapping="pathname"
strict="0"
reactions-enabled="1"
emit-metadata="0"
input-position="bottom"
:theme="isDark"
lang="zh-CN"
crossorigin="anonymous"
async />
</template>
<script lang="ts" setup>
import { computed } from "vue";
import { useData } from "vitepress";
import Giscus from "@giscus/vue";
const pageData = useData();
const isDark = computed(() => {
return pageData.isDark.value ? "dark" : "light";
});
</script>8.评论数据异常
若我们将评论组件放置在布局底部后,就会出现异常,当我们浏览当前页面的评论后,进入另一个页面,会出现评论数据并没有重新加载当前页的评论。
其实我们只需要通过key属性来强制刷新该组件即可。
vue
<template>
  <Giscus
    :key="route.path"
    repo="2sky2night/note-press"
    repo-id="R_kgDOKpx2iw"
    category="Announcements"
    category-id="DIC_kwDOKpx2i84Catge"
    mapping="pathname"
    strict="0"
    reactions-enabled="1"
    emit-metadata="0"
    input-position="bottom"
    :theme="isDark"
    lang="zh-CN"
    crossorigin="anonymous"
    async />
</template>

<script lang="ts" setup>
import { computed, watch } from "vue";
import { useData, useRoute } from "vitepress";
import Giscus from "@giscus/vue";

const pageData = useData();
const route = useRoute();

const isDark = computed(() => {
  return pageData.isDark.value ? "dark" : "light";
});

defineOptions({ name: "Comment" });
</script><template>
<Giscus
:key="route.path"
repo="2sky2night/note-press"
repo-id="R_kgDOKpx2iw"
category="Announcements"
category-id="DIC_kwDOKpx2i84Catge"
mapping="pathname"
strict="0"
reactions-enabled="1"
emit-metadata="0"
input-position="bottom"
:theme="isDark"
lang="zh-CN"
crossorigin="anonymous"
async />
</template>
<script lang="ts" setup>
import { computed, watch } from "vue";
import { useData, useRoute } from "vitepress";
import Giscus from "@giscus/vue";
const pageData = useData();
const route = useRoute();
const isDark = computed(() => {
return pageData.isDark.value ? "dark" : "light";
});
defineOptions({ name: "Comment" });
</script>自定义
1.自定义主题
通过使用自定义主题来覆盖 vitepress 的默认主题,整个页面的布局可以由自己来控制。主题相关的文件需要在.vitepress/theme下配置。
TIP
你可以通过创建一个 .vitepress/theme/index.js 或 .vitepress/theme/index.ts 文件 (即“主题入口文件”) 来启用自定义主题。
当检测到存在主题入口文件时,VitePress 总会使用自定义主题而不是默认主题。但你可以拓展默认主题来在其基础上实现更高级的定制。
创建布局组件
在.vitepress/theme下创建 Layout.vue 文件,并定义布局组件。
注意
使用自定义主题布局后,若需要显示文章内容,可以通过vitepress提供的 Content 组件,Content 组件为页面的入口组件。
vue
<template>
  <div class="layouts-container">
    <h1>ok</h1>
    <Content></Content>
  </div>
</template>

<script lang="ts" setup>
// Content为md文件的视图入口,所有的路由(md页面)组件都会在content组件中展示
import { Content } from "vitepress";
</script>

<style scoped>
.layouts-container {
}
</style><template>
<div class="layouts-container">
<h1>ok</h1>
<Content></Content>
</div>
</template>
<script lang="ts" setup>
// Content为md文件的视图入口,所有的路由(md页面)组件都会在content组件中展示
import { Content } from "vitepress";
</script>
<style scoped>
.layouts-container {
}
</style>使用自定义布局组件
在.vitepress/theme下创建 index.ts 文件,并覆盖默认主题。
ts
import Layout from "./Layouts.vue";

export default {
  Layout,
  enhanceApp({ app, router, siteData }) {
    // ...
  },
};
import Layout from "./Layouts.vue";
export default {
Layout,
enhanceApp({ app, router, siteData }) {
// ...
},
};这样就成功的设置了自定义主题,页面的布局完全由自己的配置。
2.扩展默认主题
有时我们不想去手动重头搭建整个布局,只是想在默认主题扩充下部分内容。
vitepress/theme包下提供了对应的组件,可以让我们对原有组件进行扩充。
定义布局组件
在.vitepress/theme下创建Layout.vue,并引入vitepress/theme提供的组件,该组件中提供了许多插槽,供使用。
vue
<template>
  <div class="layouts-container">
    <Layout> </Layout>
  </div>
</template>

<script lang="ts" setup>
import DefaultTheme from "vitepress/theme";

const { Layout } = DefaultTheme;
</script>

<style scoped>
.layouts-container {
}
</style><template>
<div class="layouts-container">
<Layout> </Layout>
</div>
</template>
<script lang="ts" setup>
import DefaultTheme from "vitepress/theme";
const { Layout } = DefaultTheme;
</script>
<style scoped>
.layouts-container {
}
</style>覆盖默认主题
ts
import Layout from "./Layout.vue";

export default {
  Layout,
  enhanceApp({ app, router, siteData }) {
    // ...
  },
};
import Layout from "./Layout.vue";
export default {
Layout,
enhanceApp({ app, router, siteData }) {
// ...
},
};Layout slots
默认主题布局的全部可用插槽如下:
当 layout: 'doc' (默认) 在 frontmatter 中被启用时
doc-top
doc-bottom
doc-footer-before
doc-before
doc-after
sidebar-nav-before
sidebar-nav-after
aside-top
aside-bottom
aside-outline-before
aside-outline-after
aside-ads-before
aside-ads-after
当 layout: 'home' 在 frontmatter 中被启用时
home-hero-before
home-hero-info
home-hero-image
home-hero-after
home-features-before
home-features-after
当 layout: 'page' 在 frontmatter 中被启用时
- page-top
- page-bottom
当未找到页面 (404) 时:
总是启用:
- layout-top
- layout-bottom
- nav-bar-title-before
- nav-bar-title-after
- nav-bar-content-before
- nav-bar-content-after
- nav-screen-content-before
- nav-screen-content-after
搜索功能
1.本地搜索
js
export defualt {
    themeConfig:{
         search: {
      		provider: 'local'
    	}
    }
}
export defualt {
themeConfig:{
search: {
provider: 'local'
}
}
}部署
- https://juejin.cn/post/6844904122873806856
- https://zhuanlan.zhihu.com/p/562139569
- https://zhuanlan.zhihu.com/p/631088671
问题
1."vitepress" resolved to an ESM file
详细错误:"vitepress" resolved to an ESM file. ESM file cannot be loaded by require. See http://vitejs.dev/guide/troubleshooting.html#this-package-is-esm-only for more details. [plugin externalize-deps]
解决方法:在package.json中添加"type":"module"配置即可。
json
"type": "module" "type": "module"文档或参考
- https://skewb.gitee.io/vitepress/reference/default-theme-last-updated.html
- https://vitepress.dev/guide/getting-started
- https://juejin.cn/post/7239341970463391781?searchId=202311021347312E4B2FBD548A330F6846#heading-12
- https://juejin.cn/post/7136883164357591047?searchId=20231102134223E52E04926072FE1323FA#heading-8
- https://juejin.cn/post/6965510644007665671#heading-56
- https://vanchkong.github.io/VitePressCN/guide/custom-theme